You can create a skeleton and easily align the joints by snapping them onto the construction plane.
컨스트럭션 플랜 위에 스냅해서 조인트를 쉽게 정렬하여 스켈레톤을 생성할 수 있다.
1. In the network editor at the geometry level, have your character geometry available.
Turn on the template flag for your character’s geometry node.
지오메트리 레벨의 네트워크 에디터에서는 캐릭터 지오메트리를 준비해라.
캐릭터 지오메트리 노드에서 템플릿 플랙을 켜라.
2. Create a Skeleton SOP node.
스켈레톤 노드를 생성해라.
3. Select the Skeleton SOP and turn on its display flag.
You will now be able to see your character’s geometry while drawing its skeleton.
스켈레톤 노드를 선택하고 디스플레이 플랙을 켠다.
스켈레톤을 그리는 동안 캐릭터 지오메트리를 볼 수 있을 것이다.
4. Select the Skeleton SOP, click in the viewport, and press Enter.
You are now in the Skeleton interaction state.
In this state, you have access to the Skeleton toolbar above the display, the RMB menu, and the skeleton hotkeys.
스켈레톤 인터렉션 상태에 진입했다.
이 상태에서는 디스플레이 상단의 스켈레톤 툴바, 우클릭 메뉴, 단축키에 접근할 수 있다.
5.Display the construction plane in the viewport by clicking on the right toolbar.
뷰포트 우측 툴바를 클릭함으로써 컨스트럭션 플랜을 표시할 수 있다.
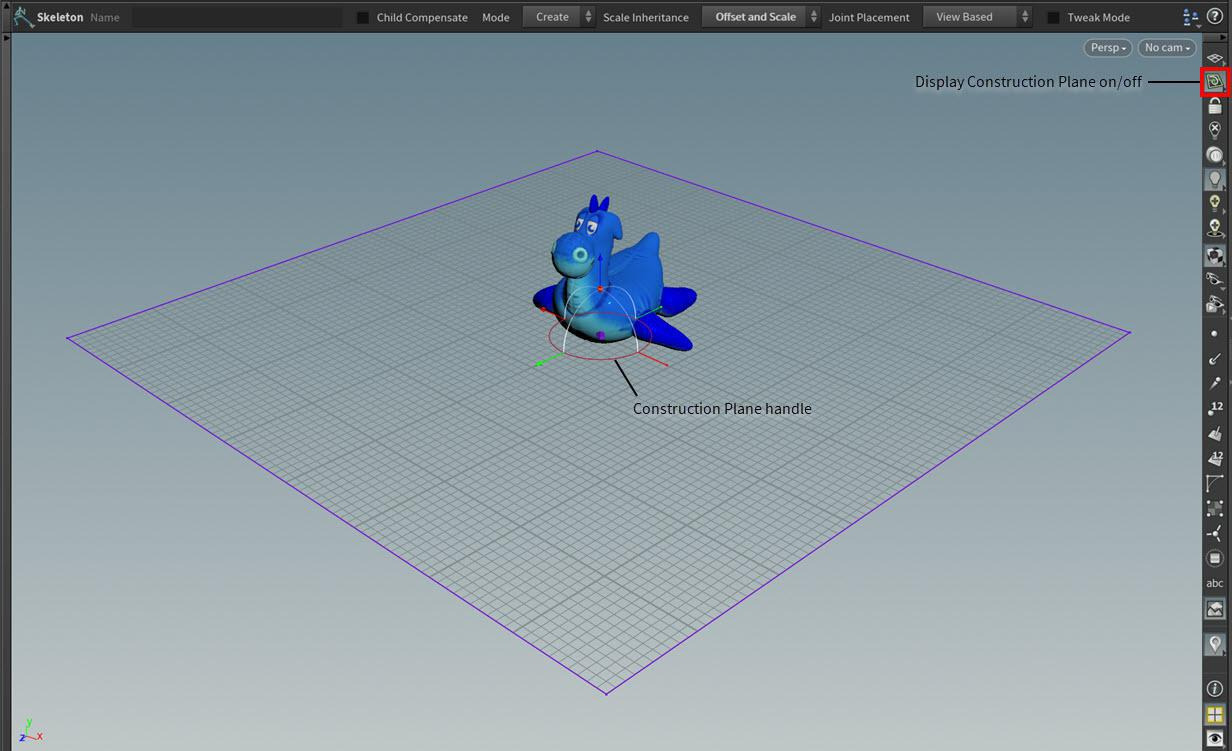
Construction plane in the viewport
If the construction plane handle is not displayed, RMB click the construction plane icon and turn on Construction Plane Handle.
만약 컨스트럭션 플랜 핸들이 안보인다면, 컨스트럭션 플랜 아이콘을 우클릭해서 켤 수 있다.
6. Set the orientation of the construction plane by RMB clicking the construction plane handle and choosing Align normal with world [X|Y|Z] axis.
컨스트럭션 플레인 핸들을 우클릭하고 'Align normal with world [X|Y|Z] axis'를 선택하여 컨스트럭션 플랜의 방향을 설정하라.
For example, selecting the Align normal with world X axis option will orient the construction plane so that its normal points along the X-axis.
예를 들어, 'Align normal with world X axis' 옵션을 선택하면 노말이 X축을 향하도록 컨스트럭션 플랜의 뱡항이 설정된다.
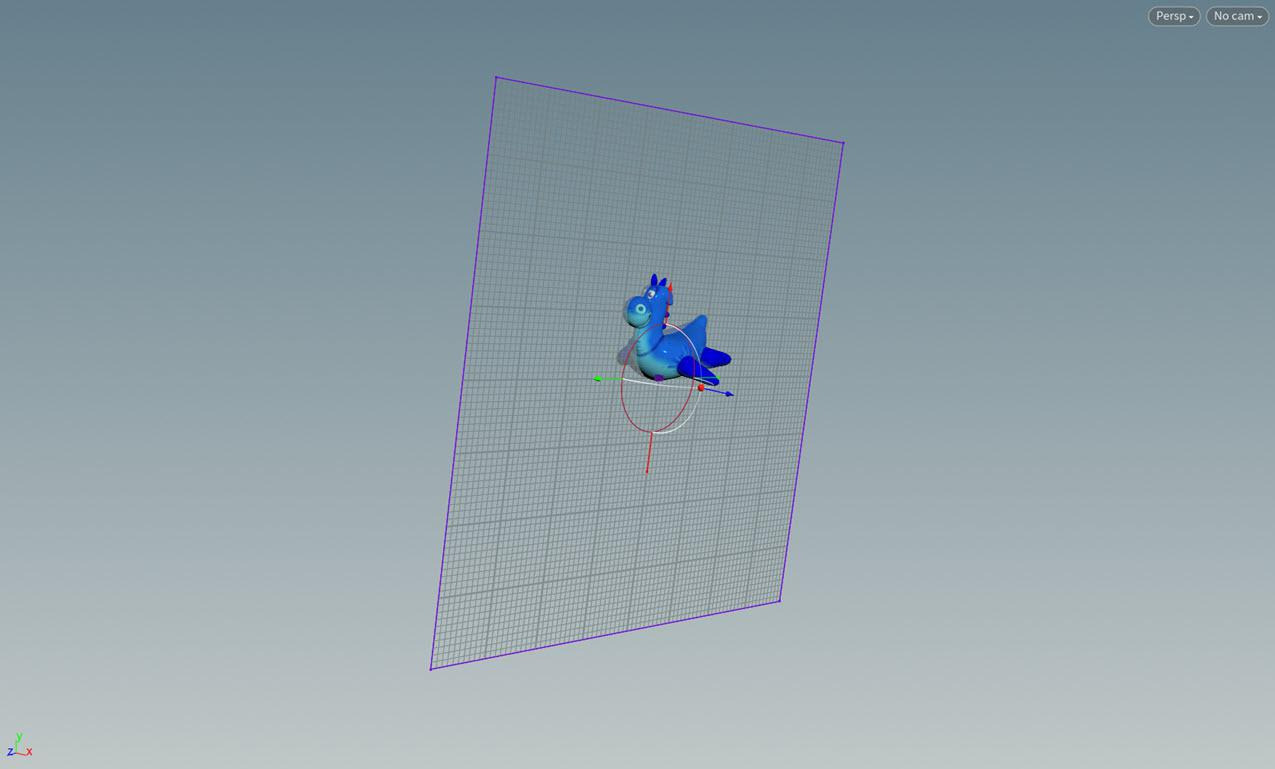
7.On the Skeleton toolbar, select Joint Placement ▸ Freehand.
스켈레톤 툴바에서 Joint Placement -> Freehand를 선택한다.
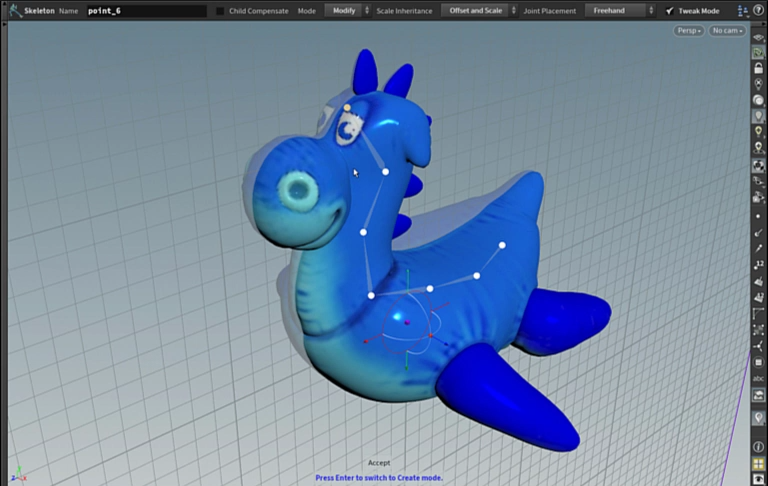
8. Draw your joints. The joint chain will snap to the construction plane.
조인트들을 그려라.
조인트 체인이 컨스트럭션 플랜에 스냅될 것이다.
https://www.sidefx.com/docs/houdini20.0/character/kinefx/skeletons.html
Working with skeletons
You can adjust the joint rotation axes for a joint chain using the construction plane. In the below example, we will be orienting the axes of an elbow in a biped arm. In the network editor, select the Skeleton SOP node. Click in the viewport and press Ente
www.sidefx.com
'이펙트 (FX) > 이펙트 팁 : Houdini' 카테고리의 다른 글
| [Houdini/Rigging] 폴리곤 라인을 조인트 체인으로 변환하기 (Turn a polygonal line into a joint chain) (0) | 2026.08.05 |
|---|---|
| [Houdini] 지오메트리를 베리에이션 주면서 복사하는 법 (For-each copy, Varying Copies, Copy Stamp) (0) | 2026.08.04 |
| [Houdini/Rigging] 스켈레톤 생성 기초 (Draw a skeleton, KineFX) (0) | 2026.07.10 |
| [Houdini/Rigging] KineFX의 스켈레톤 (Skeleton, Joint) (0) | 2026.07.09 |
| [Houdini/Rigging] KineFX 소개 (APEX) (0) | 2026.07.09 |


댓글