
간단한 도형을 병렬적인 절차에 따라 그리는 방법을 배운다.
Rectangle
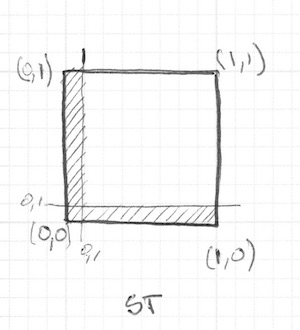
정사각형을 그리기
if 문 사용
if ( (X GREATER THAN 1) AND (Y GREATER THAN 1) )
    paint white
else
    paint black
if 문을 step()으로 변경
uniform vec2 u_resolution;

void main(){
    vec2 st = gl_FragCoord.xy/u_resolution.xy;
    vec3 color = vec3(0.0);

    float left = step(0.1,st.x);
    float bottom = step(0.1,st.y);
    color = vec3( left * bottom );

    gl_FragColor = vec4(color,1.0);
}
코드를 줄여보자.
vec2 borders = step(vec2(0.1),st);
float pct = borders.x * borders.y;
오른쪽과 상단도 적용
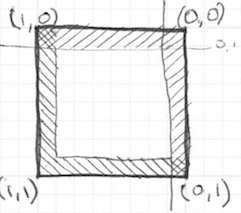
vec2 bl = step(vec2(0.1),st);       // bottom-left
vec2 tr = step(vec2(0.1),1.0-st);   // top-right
color = vec3(bl.x * bl.y * tr.x * tr.y);
step() 대신 smoothstep()을 사용해도 된다.
부드러운 테두리로 변한다.
Circles
원은 다른 접근 방식이 필요하다.
한가지 방법으로는, step() 함수를 사용하여 원을 그릴 수 있도록 공간 좌표를 다시 매핑하는 것이다.
픽셀에서 원의 중심까지의 거리를 계산하여 이를 구현할 수 있다.
가장 쉬운 방법은 두 점(이 경우 픽셀 좌표와 캔버스의 중심)을 인자로 넣어,
distance함수를 사용하는 것이다.
코드에 사용된 방법은 a, b, c가 있다.
모두 결과는 동일하다.

void main(){
	vec2 st = gl_FragCoord.xy/u_resolution;
    float pct = 0.0;

    // a. The DISTANCE from the pixel to the center
    pct = distance(st,vec2(0.5));

    // b. The LENGTH of the vector
    //    from the pixel to the center
    // vec2 toCenter = vec2(0.5)-st;
    // pct = length(toCenter);

    // c. The SQUARE ROOT of the vector
    //    from the pixel to the center
    // vec2 tC = vec2(0.5)-st;
    // pct = sqrt(tC.x*tC.x+tC.y*tC.y);

    vec3 color = vec3(pct);
	gl_FragColor = vec4( color, 1.0 );
}
Distance field
위의 코드 결과 이미지를 보라.
고도를 나타낸 것이라고 생각할 수 있다.
검정색일수록 더 높은 것이다.
예를 들자면, 가장 어두운 곳이 원뿔 꼭대기라고 생각해볼 수 있다. (하단 이미지 참고)
이 상태에서 0.5까지만 step으로 잘라내면 원이 생긴다.
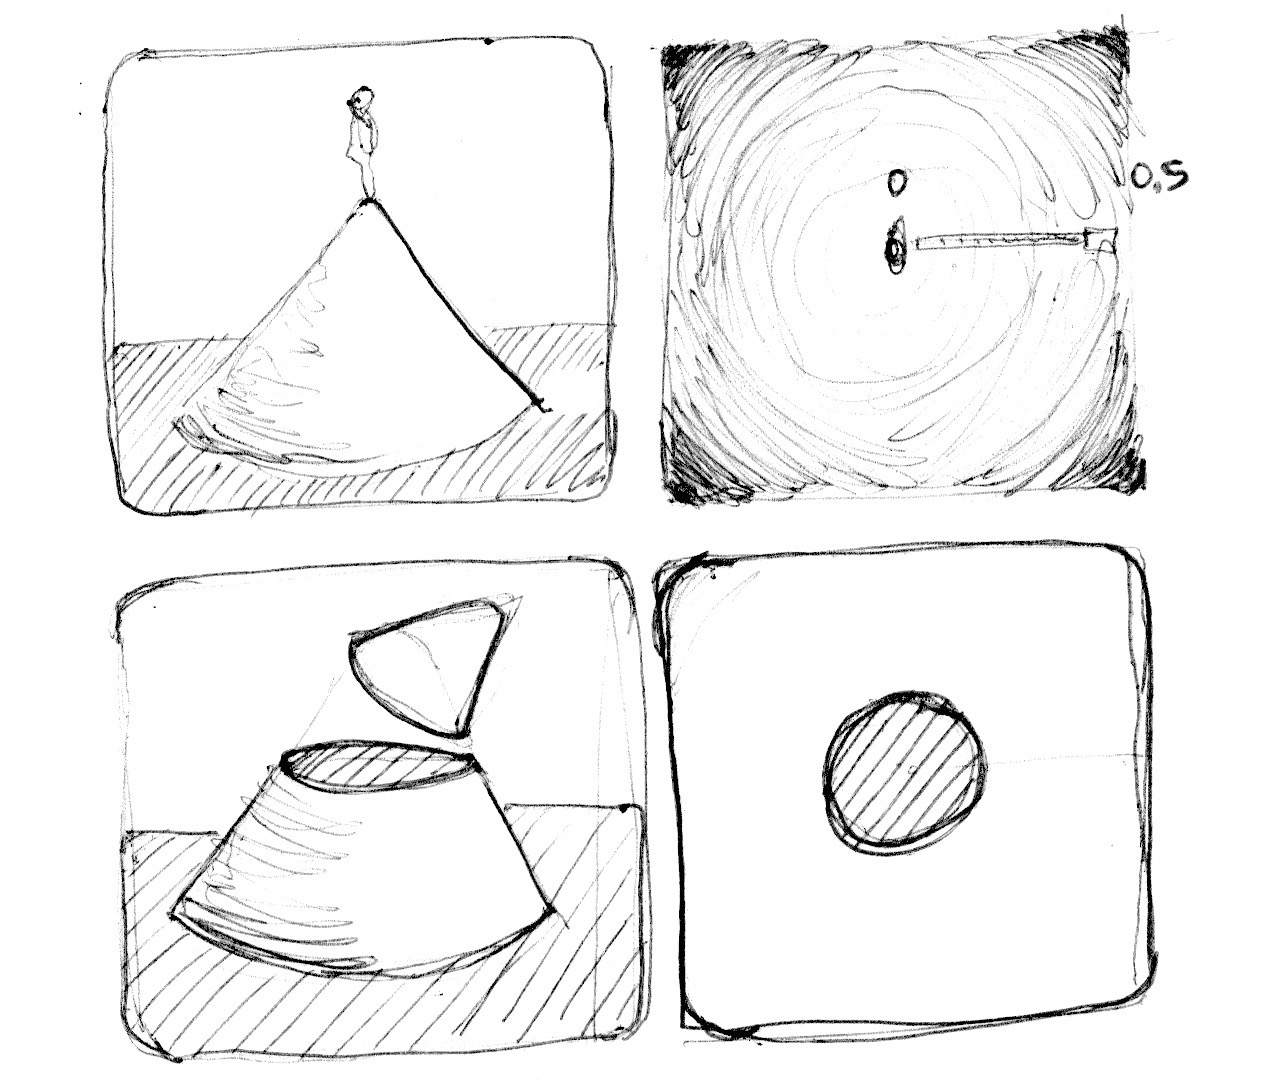
중심까지의 거리를 기준으로 공간을 재해석하여 도형을 만드는 기법을 사용한다..
이 기법을 distance field라고 한다.
다양한 방식으로 응용되는 기법이다.
sqrt() 함수는 비싸다 .
또한 이 함수와 관련된 모든 함수는 비용이 많이 든다. (distance, length ...)
그래서 dot()을 사용하는 방법도 있다.

float circle(in vec2 _st, in float _radius){
    vec2 dist = _st-vec2(0.5);
	return 1.-smoothstep(_radius-(_radius*0.01),
                         _radius+(_radius*0.01),
                         dot(dist,dist)*4.0);
}

void main(){
	vec2 st = gl_FragCoord.xy/u_resolution.xy;

	vec3 color = vec3(circle(st,0.9));

	gl_FragColor = vec4( color, 1.0 );
}
Useful properties of a Distance Field (유용한 팁)
디스턴스 필드는 거의 모든 것을 그리는 데 사용할 수 있다.
물론 도형이 복잡할수록 방정식도 복잡해진다.
하지만 특정 도형의 거리 필드를 만드는 공식을 알고 있으면, 부드러운 가장자리와 여러 윤곽선 같은 효과를 결합하거나 적용하기가 매우 쉬워진다.
그래서 거리 필드는 폰트 렌더링에서도 널리 사용된다.

코드 예제를 보자

#ifdef GL_ES
precision mediump float;
#endif

uniform vec2 u_resolution;
uniform vec2 u_mouse;
uniform float u_time;

void main(){
  vec2 st = gl_FragCoord.xy/u_resolution.xy;
  st.x *= u_resolution.x/u_resolution.y;
  vec3 color = vec3(0.0);
  float d = 0.0;

  // Remap the space to -1. to 1.
  st = st *2.-1.;

  // Make the distance field
  d = length( abs(st)-.3 );
  // d = length( min(abs(st)-.3,0.) );
  // d = length( max(abs(st)-.3,0.) );

  // Visualize the distance field
  gl_FragColor = vec4(vec3(fract(d*10.0)),1.0);

  // Drawing with the distance field
  // gl_FragColor = vec4(vec3( step(.3,d) ),1.0);
  // gl_FragColor = vec4(vec3( step(.3,d) * step(d,.4)),1.0);
  // gl_FragColor = vec4(vec3( smoothstep(.3,.4,d)* smoothstep(.6,.5,d)) ,1.0);
}
좌표계를 중심으로 이동시키고 -1과 1 사이의 위치 값으로 매핑한다.
// 24줄
fract() 함수를 사용하여 거리 필드 값을 시각화한다.
패턴을 쉽게 볼 수 있다. 패턴이 고리처럼 계속 반복된다.
// 19줄
거리 필드 수식
네 점까지의 거리를 계산한다
abs()가 핵심이다.
// 20줄
네 점까지의 거리를 min()을 사용하여 0으로 결합한다.
그 결과 흥미로운 새로운 패턴이 생성된다.

// 21줄
모서리가 둥근 직사각형이 나온다.
고리 형태가 중심에서 멀어질수록 더 부드러워지는 형태다.

// 27~29줄
거리 필드를 이용한 형태 만들기이다.
Polar shapes
각 픽셀의 반경과 각도를 계산하여 직교 좌표를 극좌표에 매핑하는 공식이다.
vec2 pos = vec2(0.5)-st;
float r = length(pos)*2.0;
float a = atan(pos.y,pos.x);
여태 거리 필드에 대해 알아보았다.
이제는 극좌표를 사용하여 도형을 그리는 또 다른 방법을 배워본다.
이 기법은 매우 간단하다.
각도에 따라 원의 반지름을 변형하여 다양한 모양을 만드는 것이다.
* 아래의 선 형태가 2차원으로 표현되면 면으로 보인다.

y = cos(x*3.);
//y = abs(cos(x*3.));
//y = abs(cos(x*2.5))*0.5+0.3;
//y = abs(cos(x*12.)*sin(x*3.))*.8+.1;
//y = smoothstep(-.5,1., cos(x*10.))*0.2+0.5;
void main(){
    vec2 st = gl_FragCoord.xy/u_resolution.xy;
    vec3 color = vec3(0.0);

    vec2 pos = vec2(0.5)-st;

    float r = length(pos)*2.0;
    float a = atan(pos.y,pos.x);

    float f = cos(a*3.);
    //f = abs(cos(a*3.));
    //f = abs(cos(a*2.5))*.5+.3;
    // f = abs(cos(a*12.)*sin(a*3.))*.8+.1;
    // f = smoothstep(-.5,1., cos(a*10.))*0.2+0.5;

    color = vec3( 1.-smoothstep(f,f+0.02,r) );

    gl_FragColor = vec4(color, 1.0);
}
Combining powers
이제는 거리 필드에 atan()을 사용해 트릭을 적용하는 방법을 배워보자.
이 트릭은 다각형의 가장자리 수를 사용하고, 극좌표를 사용하여 거리 필드를 구성한다.

// Reference to
// http://thndl.com/square-shaped-shaders.html

void main(){
  vec2 st = gl_FragCoord.xy/u_resolution.xy;
  st.x *= u_resolution.x/u_resolution.y;
  vec3 color = vec3(0.0);
  float d = 0.0;

  // Remap the space to -1. to 1.
  st = st *2.-1.;

  // Number of sides of your shape
  int N = 3;

  // Angle and radius from the current pixel
  float a = atan(st.x,st.y)+PI;
  float r = TWO_PI/float(N);

  // Shaping function that modulate the distance
  d = cos(floor(.5+a/r)*r-a)*length(st);

  color = vec3(1.0-smoothstep(.4,.41,d));
  // color = vec3(d);

  gl_FragColor = vec4(color,1.0);
}'셰이더 (Shader) > The Book of Shaders (완)' 카테고리의 다른 글
| [GLSL] 9 - Patterns (0) | 2023.04.20 |
|---|---|
| [GLSL] 8 - 2D Matrices (1) | 2023.04.20 |
| [GLSL] 6 - Colors (0) | 2023.04.18 |
| [GLSL] 5 - Shaping functions (0) | 2023.04.17 |
| [GLSL] 4 - Running your shader (세부내용 생략) (0) | 2023.04.17 |


댓글